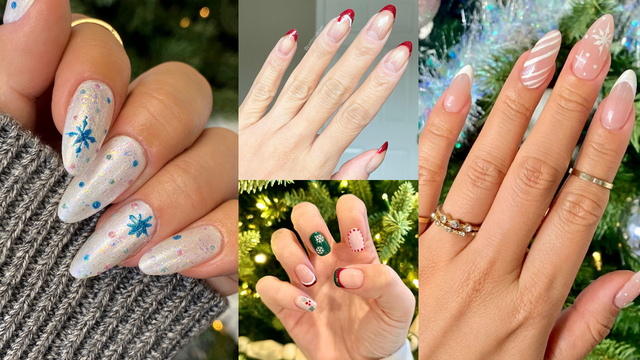
The holidays are around the corner! Are your nails ready? If not, don't worry. We've got some of the best holiday nail inspo that you can create right at home! Whether you'll be out celebrating with family & friends or keeping it low key, treat yourself to the ultimate holiday manicure with these must-try designs.

We understand that not everyone is into the bright reds and greens for the holidays. It's okay to keep things simple! Recreate this winter French manicure design that's elegant, delicate, and easy to do!
What you'll need:
- OPI GelColor - Put It In Neutral (or your favorite neutral)
- LED Lamp
- Kiara Sky Gelly Tips (Medium Almond -- or your preferred shape)
- DND - Gel Art Liner - White #002
- Nail Art Dotting Tools & Brushes
Steps:
- Apply a layer of OPI GelColor Put It In Neutral and cure under lamp for 30 seconds. (optional: you may apply a base coat prior to help your mani last longer)
- Using the DND Gel Art Liner in White and your dotting tools/brushes, create different designs on each nail -- there is NO WRONG WAY to do this! Have fun with it!
- Cure under lamp again for an another 30 seconds. (If you are applying more than one layer, cure each layer before applying the next)
- OPTIONAL: Seal your design with a top coat for a longer-lasting manciure.

If you've been on the Glazed Donut Nail Trend lately, you'll love this winter-y take. All you need is your favorite glazed-donut-inspired base color and a couple of fun shades to recreate this look.
What you'll need:
- OPI Kyoto Pearl
- Cirque Colors Mystic Moonstone
- KBShimmer Lounging Around
- KBShimmer Of Quartz
- KBShimmer Novel Idea
- Nail Art Dotting Tools & Brushes
Steps:
- Apply base coat & allow to dry completely.
- Apply 1-2 layers of (allowing each layer to completely dry before applying the next)
- Using your dotting tools & 2-3 of your desired shades, add some dots to each of the nails. To create more accents, take your dotting tool (or a fine liner brush), and use gentle strokes to create miniature snowflakes or stars.
- Seal your design with a top coat for a longer lasting manicure.

For this cute DIY nail art, @theedailyynaill puts a fun holiday twist on the French manicure. Not only is it fun & festive, it's super easy to create yourself right at home!
What you'll need:
- OPI Put It In Neutral (or your favorite neutral)
- OPI Bring Out The Big Gems
- OPI Let's Be Friends
- OPI Stay Off The Lawn
- OPI Don't Bossa Nova Me Around
- Snowflake Nail Art Stickers (or you can paint them on)
- butter LONDON Royal Emerald
- OPI Funny Bunny
- Nail Art Dotting Tools / Brushes
Steps:
- Apply a base coat if desired & allow to dry completely.
- Apply a layer of OPI Put It In Neutral (or your favorite nude color).
- For the thumb, take a thin liner brush and apply butter LONDON Royal Emerald across the free edge of the nail, creating a French manicure look. Allow to dry completely, then apply a thin line of OPI Bring Out The Big Gems beneath the Royal Emerald (be sure the Royal Emerald is completely dry before applying Bring Out The Big Gems to avoid any smudging).
- For the index finger, take a dotting tool or fine liner brush, and alternate between OPI Funny Bunny & OPI Bring Out The Big Gems. Create the design along the outer edges of the nails.
- For the middle finger, apply 1-2 coats of OPI Stay Off The Lawn. Allow to dry completely, then add a couple of snowflakes (either by hand or use nail art stickers).
- For the ring finger, repeat the step 3 (apply the red first). Then apply OPI Funny Bunny using a small dotting tool.
- For the pinky, use a dotting too and apply 3 dots of OPI Bring Out The Big Gems to create the holly berries. Then, using a fine liner brush, dip into some OPI Stay Off The Lawn and create thin, strokes to create the holly leaves.
- Seal your nail art with a top coat for a longer lasting manicure.
 Nail Art by @petitenaillover
Here is another French Manicure design with a holiday twist. @petitenaillover. kept it simple with red tips and a Santa hat to create the perfect accent nail.
What you'll need:
- DND Garnet Red (or any dark red shimmery shade)
- OPI Funny Bunny
- Nail Art Dotting Tool / Brushes
Steps:
- OPTIONAL: Apply a base coat and allow to dry completely. You many also apply a layer of your favorite neutral or pink base color for your French manicure.
- Taking a thin liner brush, apply the DND Red Garnet to the free edge of the nail, creating the crescent shape of the French manicure design.
- To create the accent nail, repeat step 2, but instead of completing the crescent shape, gently pull your brush down towards the cuticle about 1 cm (this will create the tail of the Santa Hat). Then. using your dotting tool & OPI Funny Bunny, create the brim of the Santa Hat and add a dot at the end to finish.
- Seal it with a top coat for a longer lasting manicure.

Nail art by @essieyall
We absolutely love this holiday matte manicure by @essieyall. If you're an Essie lover, you'll want to give this one a try.
What you'll need:
- Essie Head To Mistletoe
- Essie Force of Nature
- Essie Blanc
- Essie Licorice
- Essie Midnight Delight
- Essie Crochet Away
- Essie Wrapped In Luxury
- Essie Matte About You Top Coat
Steps:
- Apply a layer of Essie Head To Mistletoe.
- Using a nail art brush, dip into Crochet Away and create the shape of the gingerbread man. (feel free to have fun with this, there is no right or wrong way!)
- Using your nail art brush, dip into Blanc & Licorice to add detail to the gingerbread man.
- Using a dotting tool & Wrapped In Luxury, create the holly berries. Add as much or as little as you'd like!
- Using a fine liner brush, dip into Force of Nature and use light, gentle strokes to create the holly berry leaves.
- OPTIONAL: Seal your design with the Matte About You Top Coat (or, if you prefer a glossy finish, use your favorite shiny top coat).
Which holiday nail art designs are your favorites? Let us know in the comments below! If you have other designs you'd like to share, be sure to upload your photos to Instagram and Facebook. Tag us @beyondpolish and use the hashtag #PolishWithBeyond. You might get featured!


